How to Safely and Correctly Trim Your Baby’s Nails
- By : Jessica Jiayi W
Sometimes people got an infection from pulling a hangnail, causing their finger to swell up like a small carrot to the point where it was too sensitive to touch! Eventually, they had to go to the hospital to have the wound opened, the pus drained, and then treated with medication for it to heal gradually.
Essentially, a hangnail is a minor skin injury, not a serious issue on its own. However, pulling a hangnail with bare hands can worsen the wound and lead to a secondary bacterial infection, such as paronychia.
What causes hangnails?
While a lack of vitamins A and B can indeed lead to hangnails, they are not the only causes, nor should you indiscriminately supplement with trace elements.
In dry climates, children who frequently chew on their fingers, or those in an exploratory phase eager to touch everything, may experience prolonged contact and friction between their fingers and objects, which can lead to the development of thin hangnails.
How should you deal with hangnails then?
Many children, upon noticing a hangnail, often try to tear it off with their hands or bite it off with their teeth. Some mothers may also feel that quickly pulling it off along the grain is sufficient. However, this is not recommended!
If you notice a hangnail on your child’s hand, start by soaking the affected area in warm water to soften the nail and surrounding skin. Next, carefully trim the hangnail at its base using a clean nail clipper. Finally, apply a nourishing oil enriched with vitamin E to massage the nails and surrounding skin.
If a hangnail has been pulled off by hand, simply applying a band-aid is not sufficient. The proper approach is to soak the wound in an antibacterial solution like coptis or another suitable cleaning solution, then apply antibiotic ointment. Repeat this process for 3-5 days to ensure the wound heals properly.
Can hangnails be prevented?
The doctor advises that the best way to prevent hangnails is to keep the skin of the hands moisturized, and children should use hand cream regularly. For children’s hand cream, non-irritating options such as greasy creams rich in lanolin and vitamin E are recommended.
Also, a balanced diet rich in vitamins A and B, such as egg yolks, liver, carrots, and green vegetables, is also important.
You may be cutting your child’s nails incorrectly!

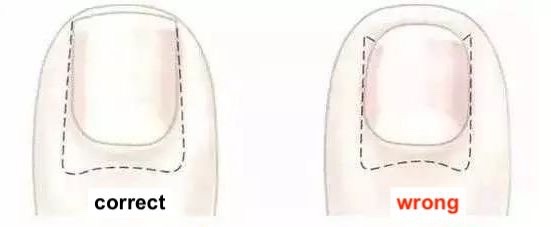
Are you trimming your child’s nails like the one in the right picture? Do you believe this method is clean and hygienic? In reality, cutting nails this way can damage their protective function, potentially leading to the condition shown in the next picture—commonly known as ingrown nails!
Most ingrown nails are due to improper handling!
Most cases of ingrown nails in babies occur because mothers, fearing the sharp sides of the nails might accidentally scratch the baby’s skin, trim off the sides of the nails. But did you know? Cutting nails this way can actually cause them to grow faster and into the nail groove, creating a spike-like compression that can lead to infection!
Some newborn babies have soft nails that mothers are hesitant to trim, which can sometimes lead to ingrown nails as the nails easily bend over.
How long should you trim a baby’s nails?
Generally speaking, a baby’s fingernails grow faster than their toenails. Fingernails should be trimmed 1-2 times a week, while toenails need trimming 1-2 times a month. Each baby’s nail growth rate varies; trim them as soon as they extend beyond the fingertips.
Don’t trim your baby’s nails too short!
If a baby’s nails are trimmed too short, they can easily separate from the nail bed when grabbing objects, exposing the soft flesh at the front and making it susceptible to paronychia. There’s no need to trim the baby’s nails excessively; simply ensure the nail length is flush with the fingertips.
How to safely trim a baby’s nails
When trimming a very small baby’s nails, it’s best to do it while they are sleeping. Position yourself next to the bed for stability, gently grasp the baby’s hand closest to you, and trim the nails in the same direction and angle to avoid cutting too deeply and causing discomfort. Separate the baby’s fingers, focus on trimming one finger at a time, and then move on to the next.
Now that the baby is a bit older and more cooperative, you can have them sit against you or in your arms while you gently grasp one of their hands.
The sequence of trimming is crucial:
Before trimming, soak the nails in warm water to soften them, which makes cutting easier. Start by trimming the middle of the nail before addressing the sides. This approach helps maintain control over the trimming length and prevents cutting the corners too deeply.
Lastly, use a nail file to smooth out any protruding nail corners. Mothers, remember to run your fingers along the edge of the baby’s nails to promptly remove any sharp angles!
To clean dirt from under the nails, use water after trimming instead of picking it out with hard objects. This prevents potential injury to the baby and avoids making the nails even shorter.
Babies should also have their hands moisturized daily. Apply hand cream all over, covering both the palms and the backs of their hands. Pay attention to the nail edges, the base of the thumb, and the wrists, as these areas are crucial for moisturizing.
If mothers are concerned about cream around the nails being ingested by the baby, they can opt for unscented oils instead. However, scented oils, despite their smooth appearance, do not effectively lock in moisture and can actually contribute to drier hands.
If you’re worried about the baby ingesting hand cream, you can apply a small amount of olive oil or vitamin E around the baby’s nails instead.

